NEW Turnigy 9X V2 2.4GHz Radio with 8ch Rx & Popular Mods like ER9X, backlight, and USB interface!
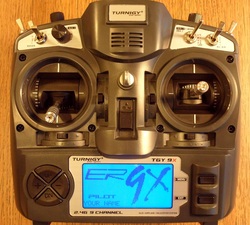
Hello fellow R/C enthusiasts!
I am selling NEW & UPGRADED Turnigy 9X Tx/Rx packages with several key modifications. These mods transform the radio from a sleeper to a keeper! I'm using one of these radios for myself and highly recommend it with the ER9X firmware. It is absolutely amazing, that's all I can say. Total flexibility, assign any function to any channel, mix anything to anything, multiple mixes, capabilities I've never seen even on the JR 12X! Add to that the ability to easily backup your model programming to your PC, edit models on the PC, select from various versions of 3rd party firmware, and numerous other mods - this is a total winner! On top of all that, this radio uses Frequency Hopping Spread Spectrum (FHSS) technology for a state-of-the-art radio link that is almost totally immune from noise and interference!
For reference, this same basic radio is referred to as different models including: Turnigy 9X V2, TH9X, FlySky, Eurgle, and Imax. There are at least a couple of different hardware versions, and I'm selling the latest one.
Here is the complete list of installed mods and updates:
- LCD Backlight in natural Blue (White also available)
- Transistor mod for the backlight allowing firmware control, so the light can be turned on and off by the firmware or any switch in various ways. It can even sense stick movement and turn the light on/off!
- PPM Trainer/Sim fix to allow use of the radio with a Simulator or as a Trainer radio
- Firmware programming interface & cable
- Stock battery tray still fits into the battery compartment.
- Optional 3S Li-Po 1800mAh battery pack for long life
- Easy access to programming interface cable
- Included USBASP programmer
- NEW! The 9X can now be powered and/or charged through the charging jack!
- Radio is configured for Mode 2 (USA), however if you need any other Mode, just let me know!
All mods come installed and tested, pots and sticks calibrated, voltage readout calibrated, gimbal pots
checked and secured as needed (sometimes they are slightly loose).
I believe this is the best package of mods for the 9X available. There are many more mods available to suit your
particular needs, but those are getting very specific and don't appeal to the "masses" like the installed mods I've chosen. However, if you need something special just let me know and I can set you up!
For more details & instructions about the ER9X firmware and other mods, see: http://er9x.googlecode.com/
The ER9X PDF manual is here: http://er9x.googlecode.com/svn/trunk/doc/ER9x%20Users%20Guide.pdf
THe ER9X Wiki manual is here: http://9xforums.com/wiki/index.php/Er9x_user_guide
If you would like to flash you radio with the latest ER9X firmware with the HeliBatics.com branding, you can download it here. The XPM image file is here, which can be added to the hex file of your choice with eePe. Thanks for the advertising! The HeliBatics branded file is exactly the same as normal, just with a custom splash screen on bootup.
Fast USA shipping from Dallas, Texas! Get it in just a few days!
ORDER NOW! UNITS ARE AVAILABLE for IMMEDIATE SHIPMENT!
Additional receivers are also available separately at the bottom of this page...
See below for all the details of this radio and the installed mods!
Front of radio
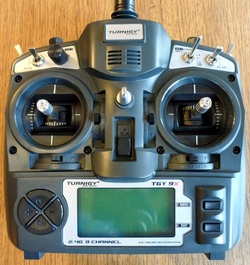
Front view of the entire radio, except for the 2.4GHz antenna which extends out the top of the photo frame. It has the usual 45/90 degree bend, and 180 degree totation. Very clean and nice layout. I planned carefully so that no modifications to the outside of the radio are required. It looks completely stock, with no holes, and no exterior alterations at all.
ER9X firmware at bootup
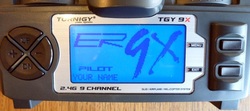
Here you can see the Turnigy 9X main screen booting the ER9X firmware with backlight on. This firmware is truly amazing, rivaling features I've seen on any radio at any price. My JR 12X isn't getting much use these days since I got one of these.
Back of radio
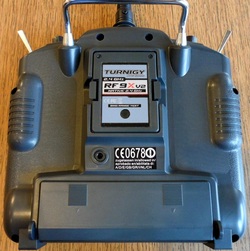
Back view of radio. Completely stock, no holes or modifications to the outside.
NOTE: Even though the RF module is removable, I highly recommended you do NOT remove it. This is because the RF coax goes through the radio. When you re-insert the module, it's almost guaranteed that you will crimp the coax, which could reduce the range. There's really no reason to remove the RF module unless you are replacing it with a 3rd party unit. In addition, I have already installed the PPM SIM/TRAINER fix, so there's no need to remove the module for that either!
NOTE: Even though the RF module is removable, I highly recommended you do NOT remove it. This is because the RF coax goes through the radio. When you re-insert the module, it's almost guaranteed that you will crimp the coax, which could reduce the range. There's really no reason to remove the RF module unless you are replacing it with a 3rd party unit. In addition, I have already installed the PPM SIM/TRAINER fix, so there's no need to remove the module for that either!
ER9X Version Display
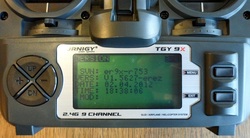
Here's a view of the version of firmware of ER9X. Note that your radio may have a different version depending on what is available at the time of production.
However, I can pre-load any version you want, if you don't want the latest - just leave me a note at checkout.
However, I can pre-load any version you want, if you don't want the latest - just leave me a note at checkout.
ER9X Version Display with Backlight
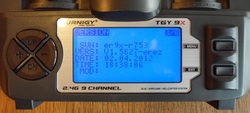
Same view of version screen with backlight on.
NOTE: Be sure to increase contrast to ~32 or so after freshly flashing the radio or the display will appear "slow" to refresh and look "faded".
NOTE: Be sure to increase contrast to ~32 or so after freshly flashing the radio or the display will appear "slow" to refresh and look "faded".
Front inside of 9X case
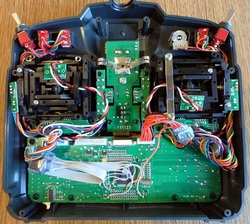
Here you can see the back of the front half of the radio. You can see the wires connected to the main board with the 10-pin connector on the lower middle/left, and the transistor modified LCD driver on the middle/right below the gimbal. The new wiring is carefully secured with hot glue or tie wraps to eliminate any possible binding or pulling damage.
While I have these open I carefully check everything and correct any problems or potential problems before I assemble and ship them. I've done a lot of these and so I know what to look for, such as loose gimbal pots and poor wire routing! I've seen a number of defective units from the factory as well, but you won't have to worry about that.
While I have these open I carefully check everything and correct any problems or potential problems before I assemble and ship them. I've done a lot of these and so I know what to look for, such as loose gimbal pots and poor wire routing! I've seen a number of defective units from the factory as well, but you won't have to worry about that.
Back inside of 9X radio
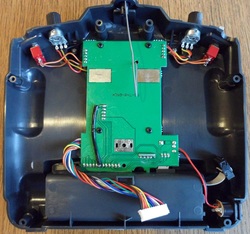
Here you can see the back/inside of the 9X radio. You will notice the mod on the circuit board for the PPM Simulator/Trainer fix (black shrink covered resistor, next to lower left screw). This allows the radio to be used with a Simulator or as a Trainer radio through the 3.5mm rear jack without unplugging the Tx module. There are no negative side affects to this mod, it just fixes those problems.
At the bottom right, you see the end of the programming cable that's coming out of the battery compartment. This will be connected to the main board when assembled. See next pics...
Update: May 12th, 2012: All radios now have two new mods; 1) The PPM fix uses an SMD chip resistor on the circuit board, and 2) The charging jack has been rewired so that you can charge the battery and/or power the radio at the same time. Any low current 9V to 12V power supply should work nicely (center pin positive). It is diode protected as well to prevent reverse polarity short circuits. I will put a new picture up eventually...
Clamshell about to go together
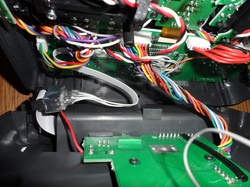
Here's a view inside the radio with front and back connected, about to join them. That's it...front and back are still easily detachable with my mods, as they are when stock.
USBASP Programmer included

This is the USBASP programmer that I am including. I test each one by using it to program each radio. Your programmer may differ slightly from this model, but most of them look exactly like this. When you program or backup to/from your 9X, there is no need to turn the radio on. It will be powered by the programmer. There are complete instructions on doing this on the internet, see note below:
NOTE: The driver for this is the trickiest part... When you insert it into your PC, it may install a driver, but most likely, it will NOT be the correct driver that we need. Please follow the instructions in this pdf document: http://er9x.googlecode.com/svn/trunk/doc/Flashing%20the%209x.pdf and you should be ok. I will post a short tutorial if there is a demand for it. Use the dedicated 9X flashing program and model editor "eePe" to make life really easy.
NOTE: The driver for this is the trickiest part... When you insert it into your PC, it may install a driver, but most likely, it will NOT be the correct driver that we need. Please follow the instructions in this pdf document: http://er9x.googlecode.com/svn/trunk/doc/Flashing%20the%209x.pdf and you should be ok. I will post a short tutorial if there is a demand for it. Use the dedicated 9X flashing program and model editor "eePe" to make life really easy.
Last but not least, the included 9X8C V2 8Ch Receiver!
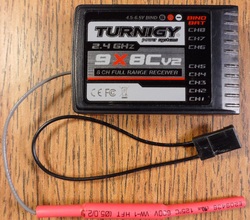
This is the Turnigy 9X8C V2 Full Range receiver included with each Transmitter. It includes the bind plug as shown.
The antenna is a mini-dipole with it's own ground plane. It seems to work well. There are no satellite ports on this receiver.
==> I also have more of these for sale separately at the bottom of the page.
The antenna is a mini-dipole with it's own ground plane. It seems to work well. There are no satellite ports on this receiver.
==> I also have more of these for sale separately at the bottom of the page.
9X8C V2 8Ch Receiver, the business end
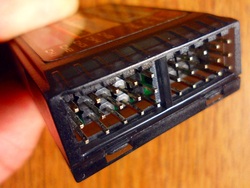
Here's the "pins end" of the Receiver. It's got 8 channels starting on the left, and a nice feature of these Rx's is that they have a dedicated bind port so you can bind without disconnecting anything. I assume you can also use the bind port as an extra power input as well, nice touch!
Finally, the Big Box!
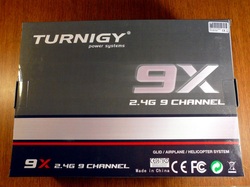
Yep, this is the box everything comes in... Well, two things...the Modified Tx and Rx. All documentation and instructions are online.
Everything shown together - The whole package!
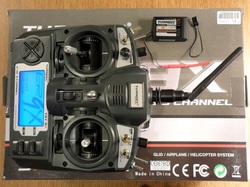
Here's the modified radio, receiver, and bind plug sitting on the box. This is everything you will receive!
You can see the 2.4GHz antenna here as well. It's pretty standard, allowing you to rotate it back and fourth 180 degrees. It can also be straight, bent 45 degrees (shown), or also bent 90 degrees, depending on the angle you like to hold your radio.
ENJOY!
You can see the 2.4GHz antenna here as well. It's pretty standard, allowing you to rotate it back and fourth 180 degrees. It can also be straight, bent 45 degrees (shown), or also bent 90 degrees, depending on the angle you like to hold your radio.
ENJOY!
Fast shipping from Dallas, Texas! Get it in just a few days!
ORDER NOW! Includes Complete Turnigy 9X V2 with Mods!
ORDER ADDITIONAL Receivers! (includes bind plug with each Rx)
Click below to buy now. You can change quantity at checkout. Thanks!
