DT750 Brushless Outrunner Motor
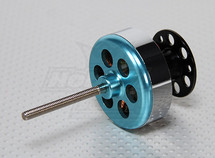
This is the HexTronik DT750 750Kv motor. This is an amazing little motor, and here's why!
- It has a very wide bell, giving it lots of torque
- It's reasonably light
- It's reasonably inexpensive
- It's easy to disassemble and replace the bearings
- Runs smooth and cool on 3S Lipo!
- It's ideal for small multirotors or airplanes
I've used this motor to build multirotors with great success. It will turn a 12x4.5 prop on 3S Lipo with good efficiency and upwards of 40oz thrust. It pulls around 18Amps max with 3S and 12x4.5 prop.
These motors do have a common problem though...I've found that about 98% of these motors come incorrectly assembled from the factory because the main shaft is not correctly located in the housing. To make up for this, they shim the bottom underneath where the C-clip goes. This doesn't hurt anything except for the fact that the motor shaft sometimes then extends past the bottom of the mount by a millimeter or two. I find this very annoying if mounting on a flat surface, but luckily it's relatively easy to fix if you want to, for the experienced builder.
THE FIX: Remove the two set screws that retain the mount, then remove the C-clip, then remove the brass washer(s) under it. Be careful with the C-clip, as this thing can go flying into space when it pops off. Hopefully there will be at least one thin washer so you can properly adjust the shaft position. If not, hopefully you are adjusting several of them and you'll have spare washers show up from other motors. Also loosen the set screw on the top of the bell so the shaft can move. Now you need a 4mm nut and either a stack of 4mm washers or something resembling a metal tube to put over the shaft so you don't have to screw the nut down too far. Put one thin brass washer back on and then put the C-clip back on. Carefully tighten the nut until the shaft slides up just enough to leave only a tiny amount of slack when you pull the shaft back and fourth against the base. If you go too far it can bind against the bearings and you'll have to find a way to push it back. Once you've got it in the right place, put the mount back on, clean and apply locktight on the 3 set screws and tighten them. You should now have a perfectly adjusted motor that will mount to a flush surface without binding! While you're in there, note how easy bearing replacement will be!
An additional improvement can be made by securing the motor wires with a bit of epoxy right under the windings to keep them from flexing. If you do this, it's best to do it while you've got the mount and bell off, and don't use too much! If you aren't experienced with small mechanical work like this, I recommend you seek assistance on these modifications, they aren't for beginners. You can easily loose small parts and/or trash the motor if you aren't careful! You've been warned!
BUY NOW! Fast USA shipping! Get it in just a few days!
Click below to Add to Cart. You can change quantity at checkout. Thanks!
